Subprogram is like reusable “mini-program” within your main CNC program. Subprograms help reduce redundancy, save time, and make your code cleaner and easier to manage. Think of them as shortcuts that perform repetitive tasks without having to rewrite the same commands over and over again.
In this guide, we’ll explain how to use subprograms with examples from popular CNC controllers such as Fanuc, Siemens Sinumerik, and Heidenhain.
What is a Subprogram?
A subprogram is a block of code written once but can be called multiple times throughout your main program. It’s especially useful for operations like drilling holes, milling patterns, or performing any task that needs to be repeated at different locations.
Here’s how it works:
- Write the subprogram separately.
- Call the subprogram whenever needed in the main program.
- Pass parameters (if necessary) to customize its behavior.
Basic Syntax of subprogram Across Controllers
Fanuc subprogram
- Sub-program Definition:
Oxxxxx(wherexxxxxis the sub-program number) - Calling a Sub–program:
M98 Pxxxxx Lnn Pxxxxx: Sub-program numberLnn: Number of times to repeat the call (optional)
Siemens Sinumerik subprogram
- Sub-program Definition:
CYCLEnnnor custom macro blocks - Calling a Sub–program: Use
CALLor predefined cycles
Heidenhain subprogram
- Sub-program Definition:
PROGRAM xxxx(wherexxxxis the sub-program name/number) - Calling a Sub-program:
JUMP TO PROGRAM xxxx
Example 1: Drilling Holes Using Fanuc subprogram
Let’s say you need to drill three identical holes at different positions.
Main Program:
O0001 (Main Program)
G54 G00 X0 Y0 Z100 (Set work coordinate system and move to safe height)
M98 P1000 L1 (Call subprogram 1000 once)
X50 Y0    (Move to next hole position)
M98 P1000 L1 (Call subprogram 1000 again)
X100 Y0   (Move to final hole position)
M98 P1000 L1 (Call subprogram 1000 one more time)
M30 (End of program)
Subprogram (O1000):
O1000 (Drilling Subprogram)
G00 Z5 (Rapid move to clearance height)
G99 G81 X#25 Y#26 Z-10 R5 F100 (Peck drill cycle)
G80 (Cancel canned cycle)
G00 Z100 (Return to safe height)
M99 (Return to main program)
Explanation:
- The sub-program drills a hole using the
G81peck drill cycle. - Parameters like coordinates (
X,Y) and depth (Z) can be adjusted dynamically if needed.
Example 2: Milling a Rectangle Using Siemens Sinumerik subprogram
Suppose you want to mill a rectangle pattern repeatedly.
Main Program:
%12345
N10 CYCLE95(5., 5., 0., 0., 10., 0., 0., 0., 0.) (Call milling cycle)
N20 CALL MY_RECTANGLE (Call custom subprogram)
N30 X100 Y0 (Move to next position)
N40 CALL MY_RECTANGLE (Repeat subprogram)
N50 M30 (End of program)
Subprogram (MY_RECTANGLE):
%MY_RECTANGLE
N10 G01 X50 Y0 F200 (Move to first corner)
N20 G01 X50 Y50     (Second corner)
N30 G01 X0 Y50      (Third corner)
N40 G01 X0 Y0       (Back to start)
N50 RETURN          (Return to main program)
Explanation:
- The sub-program defines the path for milling a rectangle.
- By calling
MY_RECTANGLE, you avoid rewriting the rectangle path each time.
Example 3: Pocket Milling Using Heidenhain subprogram
Imagine you need to create pockets in several areas of a part.
Main Program:
PROGRAM MAIN
N10 JUMP TO PROGRAM POCKET_MILLING (Call subprogram)
N20 X100 Y0         (Move to next pocket location)
N30 JUMP TO PROGRAM POCKET_MILLING (Repeat subprogram)
N40 END PROGRAM
Subprogram (POCKET_MILLING):
PROGRAM POCKET_MILLING
N10 G00 Z5          (Rapid move to clearance height)
N20 G1 X#PAR1 Y#PAR2 F100 (Start pocket milling based on passed parameters)
N30 G1 X#PAR1+50 Y#PAR2+50 (Mill the pocket boundaries)
N40 G00 Z100        (Return to safe height)
N50 END PROGRAM
Explanation:
- Parameters (
#PAR1,#PAR2) allow flexibility in defining starting points for each pocket. - This approach makes the sub-program adaptable to various pocket locations.
Tips for Beginners
- Keep Subprograms Simple: Focus on specific tasks (e.g., drilling, tapping, milling).
- Use Meaningful Names: For better readability, label subprograms clearly (e.g.,
DRILL_HOLE,MILL_RECTANGLE). - Test Individually: Before integrating into the main program, test subprograms independently to ensure they work correctly.
- Leverage Parameters: Use variables or parameters to make subprograms versatile and reusable across different jobs.
By mastering subprograms, you’ll streamline your CNC programming process and improve efficiency whether you’re working with Fanuc, Sinumerik, or Heidenhain systems! Happy machining!
What is Nesting in Subprograms?
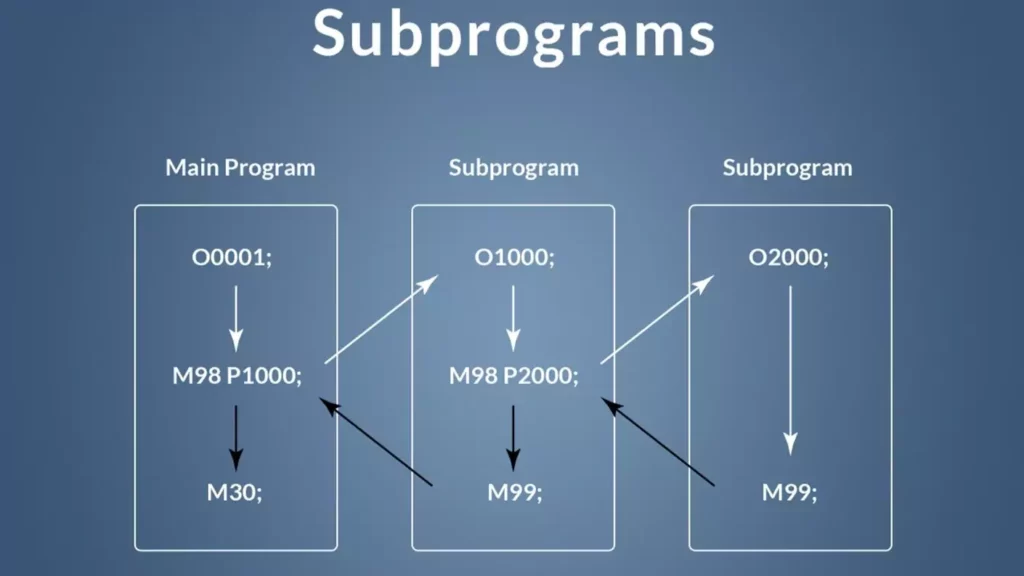
Nesting in subprograms refers to the ability of a sub-program to call another sub-program, creating a hierarchical structure. Essentially, it allows one sub-program to act as the “parent” and invoke another sub-program (the “child”). This concept is similar to how functions can call other functions in traditional programming languages.
Nesting subprograms is particularly useful when you have complex operations that require multiple levels of modularization. It helps keep your main program clean, organized, and easy to maintain.
How Does Nesting Work?
When a sub-program calls another sub-program, the control flow moves into the child one. Once the child sub-program completes execution, control returns to the parent one, which then continues from where it left off. You can nest subprograms multiple levels deep, depending on the capabilities of your CNC controller.

However, there are limits to how deeply you can nest subprograms, which vary by machine and controller type. For example:
- Fanuc: Typically supports up to 4 or 5 levels of nesting.
- Siemens Sinumerik: Supports deeper nesting but depends on the specific model.
- Heidenhain: Also supports nesting, though the depth may depend on the system configuration.
Why Use Nested Subprograms?
- Modularity: Break down complex tasks into smaller, reusable components.
- Reusability: A single sub-program can be called by multiple other subprograms, reducing redundancy.
- Clarity: Keeps the main program concise and easier to read.
- Flexibility: Allows for dynamic adjustments based on parameters passed between nested subprograms.
Example of Nested Subprograms
Let’s walk through an example using Fanuc syntax. Suppose you’re machining a part that requires drilling multiple holes in different patterns.
Main Program
O0001 (Main Program)
G54 G00 X0 Y0 Z100 (Set work coordinate system and move to safe height)
M98 P1000 L1 (Call subprogram 1000 once)
X100 Y0    (Move to next pattern position)
M98 P1000 L1 (Call subprogram 1000 again)
M30 (End of program)
Subprogram 1000 (Parent Subprogram)
This sub-program defines a pattern of three holes and uses another sub-program (O1001) to drill each hole.
O1000 (Pattern Subprogram)
G00 X#25 Y#26 Z100 (Move to starting position)
M98 P1001 L1       (Call subprogram 1001 to drill first hole)
X50 Y0             (Move to second hole position)
M98 P1001 L1       (Call subprogram 1001 to drill second hole)
X75 Y0             (Move to third hole position)
M98 P1001 L1       (Call subprogram 1001 to drill third hole)
M99 (Return to main program)
Subprogram 1001 (Child Subprogram)
This subprogram performs the actual drilling operation.
O1001 (Drilling Subprogram)
G00 Z5 (Rapid move to clearance height)
G99 G81 Z-10 R5 F100 (Peck drill cycle)
G80 (Cancel canned cycle)
G00 Z100 (Return to safe height)
M99 (Return to parent program)
Explanation:
- The main program calls
O1000, which defines a pattern of three holes. - Within
O1000, the sub-programO1001is called three times to drill individual holes. - After all three holes are drilled, control returns to the main program.
Key Points About Nesting
- Return Statements (
M99): Each sub-program must end with anM99statement to return control to its caller. - Parameter Passing: Parameters can be passed between subprograms to customize behavior dynamically.
- Depth Limitations: Be aware of the nesting depth limit imposed by your CNC controller.
- Debugging: Debugging nested subprograms can be challenging, so test each level independently before integrating them.
Example in Other Controllers
Siemens Sinumerik
%MAIN
N10 CALL PATTERN_SUBPROGRAM (Call parent subprogram)
N20 END PROGRAM

%PATTERN_SUBPROGRAM
N10 CALL DRILLING_SUBPROGRAM (Call child subprogram)
N20 RETURN

%DRILLING_SUBPROGRAM
N10 CYCLE95(5., 5., 0., 0., 10., 0., 0., 0., 0.) (Drill hole)
N20 RETURN
Heidenhain
PROGRAM MAIN
N10 JUMP TO PROGRAM PATTERN_SUBPROGRAM (Call parent subprogram)
N20 END PROGRAM

PROGRAM PATTERN_SUBPROGRAM
N10 JUMP TO PROGRAM DRILLING_SUBPROGRAM (Call child subprogram)
N20 RETURN

PROGRAM DRILLING_SUBPROGRAM
N10 G00 Z5 (Rapid move to clearance height)
N20 G1 Z-10 F100 (Drill hole)
N30 G00 Z100 (Return to safe height)
N40 RETURN
Best Practices for Nested Subprograms
- Limit Depth: Avoid excessive nesting to prevent confusion and potential errors.
- Document Clearly: Add comments to explain what each subprogram does.
- Test Incrementally: Test each subprogram individually before combining them.
- Use Parameters Wisely: Pass necessary data between subprograms to make them flexible and reusable.
By leveraging nested subprograms, you can create highly efficient and maintainable CNC programs, even for complex machining tasks!


