
For machinists, programmers, and maintenance technicians, the User Interface is your primary window into the machine’s brain. Understanding the layout, key functions, and protection levels of the SINUMERIK 808D is crucial for maximizing efficiency, preventing crashes, and ensuring operational safety.
1. The Dynamic Duo: PPU vs. MCP
The SINUMERIK 808D control system is divided into two main physical interaction points:
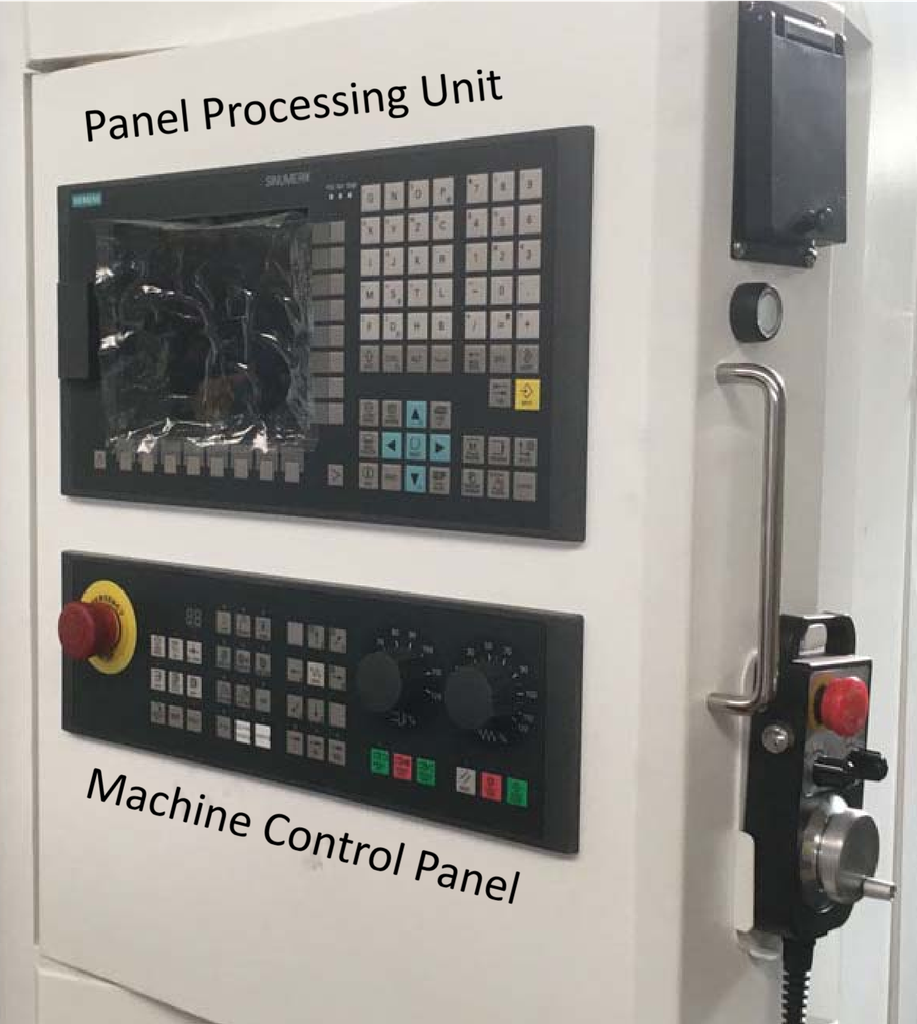
- The PPU (Panel Processing Unit): This is the screen and alphanumeric keyboard. It handles data entry, program editing, offset management, and system diagnostics.
- The MCP (Machine Control Panel): This is the physical button panel mounted on the machine. It handles real-time, hardware-level commands like axis jogging, spindle control, cycle start/stop, and emergency overrides.
Understanding which panel to use for which task is the first step to seamless operation.
2. Decoding the 808D Screen Layout
When you look at the PPU screen, it can seem busy. However, it is logically divided into specific zones to help you find information quickly:
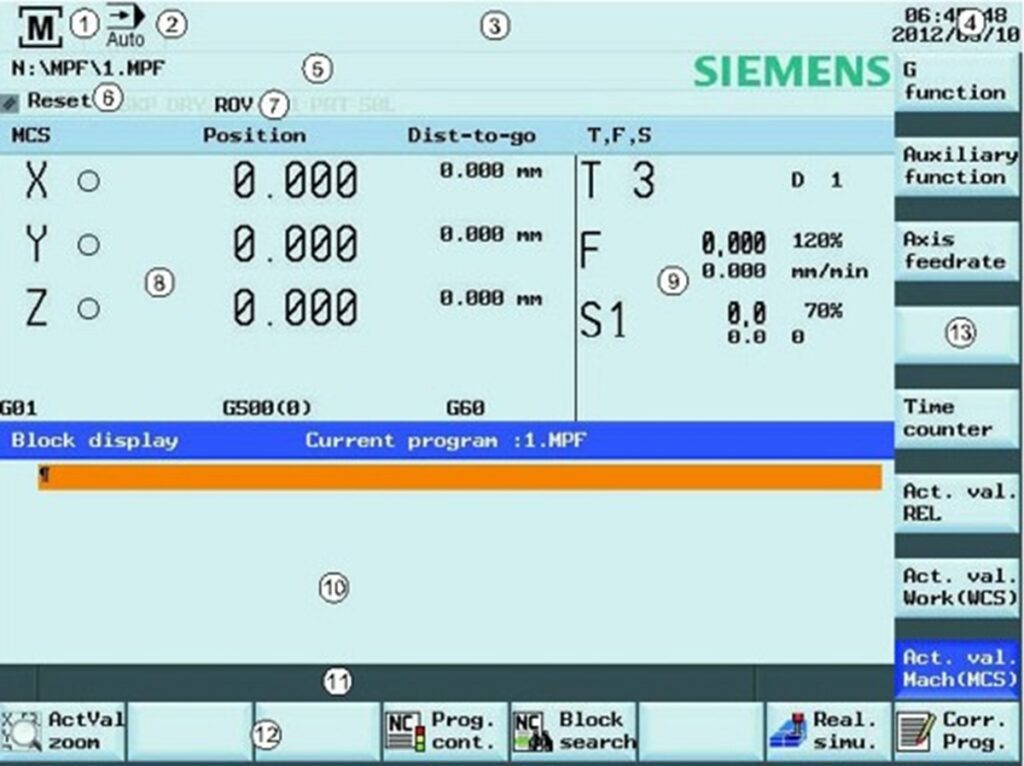
- Status Area (Top): Displays the current time, date, active program name, and active operating mode (e.g., JOG, AUTO, MDA).
- Application Area (Center): The main workspace. This is where you view your part program, tool offsets, or system parameters.
- Alarm & Message Prompt Area: Located prominently to ensure you never miss a critical fault, PLC message, or operational warning.
- Softkey Areas (Right & Bottom): These dynamic keys change based on the active menu, providing context-sensitive options (e.g., “Tool List,” “New Edge,” “Measure Manual”).
- Actual Value Window: Shows real-time axis positions, spindle speed (S), and feedrate (F).
3. Essential PPU Keyboard Shortcuts
Speed matters on the shop floor. Memorizing a few key combinations on the PPU can save you minutes of menu-navigation every day. Here are the most valuable shortcuts:
| Key Combination | Function | Practical Use Case |
|---|---|---|
<ALT> + <M> | Opens “Alarm” area | Quickly jump to diagnose an active fault. |
<ALT> + <N> | Opens “System” area | Access machine data and startup archives. |
<CTRL> + <P> | Captures screen | Take a screenshot of an alarm or setup for your maintenance log. |
<CTRL> + <R> | Restarts the HMI | A quick, soft reboot of the screen interface if it freezes (does not reboot the whole CNC). |
<CTRL> + <S> | Saves start-up archives | Crucial for backing up machine data before making parameter changes. |
<ALT> + <H> | Calls online help | Instantly pulls up context-sensitive help for the screen you are currently viewing. |
4. Mastering the Machine Control Panel (MCP)
The MCP is where your digital program meets physical reality. Familiarize yourself with these critical zones:
A. Operating Modes
- JOG: For manual axis movement, tool measurement, and setup.
- REF. POINT: Used to reference the machine axes after power-up (if not using absolute encoders).
- MDA (Manual Data Input): For typing and executing single blocks of G-code on the fly.
- AUTO: For running complete, saved part programs.
B. Program Control
- Single Block: Executes the program one line at a time. Essential for proving out a new program safely.
- Dry Run / Program Test: Simulates the toolpath without moving the axes or spinning the spindle, allowing you to verify code logic.
- Feedrate & Spindle Override Dials: Allow you to temporarily scale down speeds (e.g., to 10% or 0%) during the first run of a new program to prevent crashes.
C. Tool Changer & Axis Control
- K9 / K10 / K11: Dedicated keys for moving the tool magazine to the spindle position, returning it to the home position, and enabling manual tool release.
- Handwheel Key: Activates the electronic handwheel for precise, manual axis positioning during setup.
- Rapid Traverse Overlay: Hold this button while pressing an axis key to move the machine at rapid speed (use with extreme caution!).
5. Navigating Protection Levels
The SINUMERIK 808D uses a password-based protection system to prevent unauthorized or accidental changes to critical machine data.
- Level 7 (No Password): The default state. Allows basic operation, program editing, and setting offsets.
- Levels 3–6 (End-User Password): Requires a password (Default is often “CUSTOMER”). Grants access to modify specific machine data, advanced offset settings, and tool measurement parameters.
- Level 1 (Manufacturer Password): Reserved for machine builders and Siemens technicians. Grants full access to all machine data and NC commissioning. (Default is often “SUNRISE”, but should be changed by the OEM).
⚠️ MAINTENANCE WARNING: Before ever booting the control system with default machine data to reset a forgotten password, always ensure you have a complete data backup. Reinitializing without a backup will erase all custom machine parameters, tool offsets, and part programs.
6. Reading the Status LEDs
A quick glance at the LEDs on the PPU can tell you the health of the system without reading a single line of code:
- POW (Power): Solid Green = CNC power supply is on.
- RDY (Ready): Solid Green = CNC is fully initialized and ready for operation.
- TEMP: Unlit = Normal. Orange = CNC temperature is out of the safe operating range (check cabinet cooling/filters).
Conclusion
The SINUMERIK 808D is designed to be intuitive, but true proficiency comes from understanding why the interface is laid out the way it is. By mastering the PPU shortcuts, respecting the MCP override controls, and understanding protection levels, operators can drastically reduce setup times, prevent costly crashes, and keep the machine running safely.


